Why height is decisive
Correct height for training wheels determines their entire usefulness. There are exactly three possible positions, and two of three are problematic:
Too low: both wheels touch the ground constantly
This is the most common setting, and the most counterproductive. When both training wheels rest on the ground at the same time as the rear wheel, the bike becomes a tricycle. It can't lean, your child never engages their balance, and they learn strictly nothing about managing their center of gravity.
The result is predictable: come removal day, your child can't stay balanced. Weeks or months of practice only taught pedaling, not balance.
Too high: instability and danger
Conversely, training wheels set too high don't catch a balance loss quickly enough. Your child leans, the wheel doesn't touch in time, and down they go. This setting is dangerous because it gives a false sense of safety.
The theoretically correct height
Optimal adjustment puts each training wheel about 5 to 10 mm above the ground when the bike is upright. The bike can then lean slightly before the wheel touches down and stabilizes it. Your child starts to feel the lean and develops the beginnings of a balance reflex.
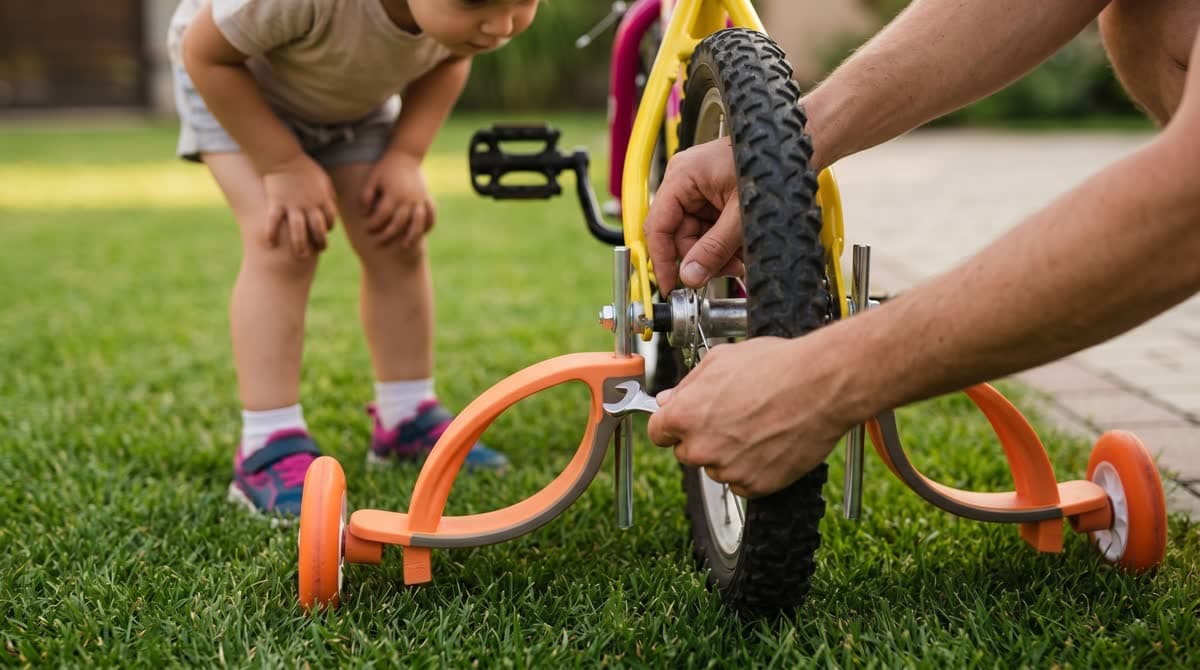
How to make the adjustment
What you need: an appropriate wrench (usually a 15 mm flat wrench or 5-6 mm Allen key depending on the model).
- Place the bike on a perfectly flat surface
- Loosen the mounting nuts on the training wheel rods
- Adjust each rod so the wheel sits 5-10 mm off the ground
- Check symmetry: both training wheels should be at the same height. Any asymmetry creates a permanent imbalance to one side.
- Tighten the nuts firmly
- Test by gently pushing the bike sideways: it should lean a bit then be caught by the training wheel
Common mistakes
- Never checking after the initial install: training wheels loosen with vibration. Check the setting every 2-3 outings.
- Ignoring wheel wear: plastic training wheels wear quickly, especially on asphalt. Uneven wear changes the effective height and creates progressive asymmetry.
- Setting on grass and riding on hard surfaces (or vice versa): the height that works on lawn is too low on tarmac, because soft ground absorbs part of the gap.
- Forgetting your child's weight: under your child's weight, the rear tire compresses slightly. Adjust with your child seated on the bike, not empty.
The fundamental problem with manual adjustment
Even with a perfect setting, rigid training wheels remain a compromise: the jump from "no help" (bike upright) to "max help" (wheel on ground) is binary. There's no graduation. Either the wheel touches or it doesn't. This abrupt transition doesn't match how a child learns balance, which is progressive by nature.
On top of that, the adjustment is static. It doesn't adapt to your child's progress. A correct height in week one can be inadequate a month later, without parents noticing.
The flexible stabilizer solution
The Baswil stabilizer eliminates the height adjustment problem entirely. Its flexible blades stay in permanent contact with the ground but only become active under pressure, that is when your child leans beyond their balance zone.
Resistance is progressive: the more the lean increases, the stronger the recovery force. There's no binary threshold, no setting to monitor, no asymmetric wear to compensate. The system adapts automatically at every moment.
To understand the full difference between these two approaches, see our flexible stabilizer vs classic training wheels comparison. And for the mechanics in detail, head over to How it works.
Frequently asked questions
What height should you set kids' bike training wheels at?
Set each training wheel 5 to 10 mm above the ground when the bike is upright. This height lets the bike lean slightly before the training wheel touches the ground, which helps the child develop the start of a balance reflex.
Why are training wheels set too low a problem?
Training wheels set too low turn the bike into a tricycle: both wheels touch the ground constantly with the rear wheel. The bike can no longer lean, the child never uses their balance and only learns pedalling, not managing the centre of gravity.
What is the danger of training wheels set too high?
Stabilisers set too high do not engage quickly enough during a loss of balance. The child leans, the wheel fails to touch the ground in time, and the fall happens. A flexible stabiliser with springy blades removes this risk: support is progressive, with no binary threshold to set.
What tool do you need to adjust training wheels?
A suitable spanner is enough: usually a 15 mm open spanner or a 5 to 6 mm Allen key depending on the model. Place the bike on a perfectly flat surface, loosen the rod nuts, adjust the height then retighten firmly.
Should you adjust training wheels with the child sitting on the bike?
Yes, adjust the training wheels with the child seated on the saddle. Under their weight, the rear tyre compresses slightly and changes the effective wheel height. A setting done empty will be too low once the child is on the bike.
How often should you check the training-wheel setting?
Check the adjustment every 2 to 3 rides. Stabilisers loosen with vibration and the plastic wears quickly, especially on tarmac, creating a gradual asymmetry. A flexible stabiliser avoids this repeated check: it has no height to set and no asymmetric wear to compensate for.
Why does manual training-wheel adjustment stay a compromise?
Manual adjustment stays binary: the wheel touches or does not, with no gradation. This abrupt transition does not match gradual balance learning. The setting is also static and does not adapt to the child's progress over the weeks.
Does the flexible Baswil stabiliser need a height adjustment?
No, the Baswil stabiliser removes height adjustment. Its flexible blades stay in contact with the ground but only become active under pressure, when the child exceeds their balance zone. The system adapts automatically, with no binary threshold or asymmetric wear to offset.
No more adjusting, no more worry
Baswil replaces classic training wheels on all 12 to 16 inch kids' bikes (including Btwin Decathlon). 5-minute installation, no height adjustment needed, automatic adaptation to your child's progress.
€39. 30-day money-back guarantee.